TryHackMe - Splunk Data Manipulation
Daan Perry - 2025-07-28
Intro
Find the room here https://tryhackme.com/room/splunkdatamanipulation
This room covers how to parse custom logs to Splunk. While an unlikely job for a SOC level 1, knowing how Splunk works under the surface and how logs are processed can help an analyst better understand what they're looking at. In some cases it may even allow an analyst to ask for specific changes or recommend an improvement to make their job easier.
It is highly recommended to have a basic understanding of Regex. Go through this room first if Regex is not something you are familiar with https://tryhackme.com/room/catregex.
It is highly recommended to have a basic understanding of Regex. Go through this room first if Regex is not something you are familiar with https://tryhackme.com/room/catregex.
Room introduction
Data processing, parsing, and manipulation in Splunk are crucial for extracting meaningful insights and enabling effective analysis of machine-generated data. From a security perspective, these capabilities are particularly valuable in identifying and responding to security threats, investigating incidents, and monitoring system health.
Let’s play a scenario where You are John, who is working as a SOC Analyst at CyberT. You have been presented with a scenario where one of our clients needs to ingest some logs from a custom source.
Let’s play a scenario where You are John, who is working as a SOC Analyst at CyberT. You have been presented with a scenario where one of our clients needs to ingest some logs from a custom source.
Tasks
General Advice
When you start this lab Splunk is not running yet, no need to start the browser. It wont be until Task 5 that the Splunk server is started. You will end up restarting Splunk often which takes a few minutes each time. Make sure that you double check all config files you write to prevent unnecessary restarts. It is also highly recommended you finish this room in one sitting as you'll be setting up a few things that would need to be repeated otherwise.
Most of the Splunk and managing Splunk config files is going to require you to use
sudo
. While it is possible to use sudo su
to get around this, some of the room's instructions are going to use the ~/Downloads/scripts
. This command would need to switch to /home/ubuntu/Downloads/scripts
.Quick command-line utility reference
Copy a file
cp current/file/location/filename.txt copy/to/location/filename.txt
Copy a folder
cp -r current/folder/location new/folder/location
list a folder's contents
ls -l filename
Display file's contents
cat filename
Edit a file's contents
nano filename
Access home directory
~/Documents
or ~/Downloads
Count words or lines
wc -l
= lines in file or output and wc -w
= words in file or outputTask 2: Scenario and Lab Instructions
A quick way to get the number of files & folders in a folder is to pipe (done with the | character) the output of
Navigate to the correct folder on the commandline and use
ls
to wc -l
. The -l
option will found the number of lines.Navigate to the correct folder on the commandline and use
ls | wc -l
.Task 3: Splunk Data Processing
An informational Task, which explains the steps we'll be taking in later tasks.
An important thing I would like to add to the information in this task is that files created in the DefaultApp are meant as "the default state" of the app. If you were to share your app with multiple analysts through a Splunk Deployment Server the default settings would be overridden on every update to make sure they match the new version. Each analyst could still add extra rules in the local folder which would persist between updates.
Unless you are creating an app, as we're doing in this room, it is generally not recommended to edit the files in
$SPLUNK_HOME/etc/system/default
. Instead one would edit the files in the /opt/splunk/etc/DataApp/local
folder.Task 4: Exploring Splunk Configuration files
Just like the props.conf in the previous task, all the .conf files you will be modifying can be found in the
/opt/splunk/etc/DataApp/default
folder. Read the information carefully so you understand what each config file is used forTask 5: Creating a Simple Splunk App
Now it is time to start the Splunk instance and get some logs into Splunk. From the commandline run
Remember to use sudo to run the start command.
sudo /opt/splunk/bin/splunk start
, this will start the Splunk instance. It will take a few minutes before Splunk is ready and can be accessed. The Splunk dashboard will be available on ip_address:8000
.Remember to use sudo to run the start command.
At this time no .conf files exist yet, so don't be surprised if you tried to checkout the DataApp/default folder and did not see anything. The task's instructions assume you're currently in the
/opt/splunk/etc/apps/DataApp/default
folder and used sudo su
before running the nano inputs.conf
command. If you're not, you can use the command sudo nano /opt/splunk/etc/apps/DataApp/default/inputs.conf
to create the inputs.conf file.Follow the instructions in the task to get a feel for how Splunk works, you will not be using the logs created in this task for future tasks.
Task 6: Event Boundaries
Let's start generating some actual logs and inspecting them in Splunk.
An easy way to copy files from the Downloads directory to the DataApp/bin folder is by using the cp utility, use sudo if you are using the ubuntu user.
or if you are sudo
An easy way to copy files from the Downloads directory to the DataApp/bin folder is by using the cp utility, use sudo if you are using the ubuntu user.
sudo cp ~/Downloads/scripts/vpnlogs /opt/splunk/etc/apps/DataApp/bin/vpnlogs
or if you are sudo
cp /home/ubuntu/Downloads/scripts/vpnglogs /opt/splunk/etc/apps/DataApp/bin/vpnlogs
Copy files
Copy VPN logs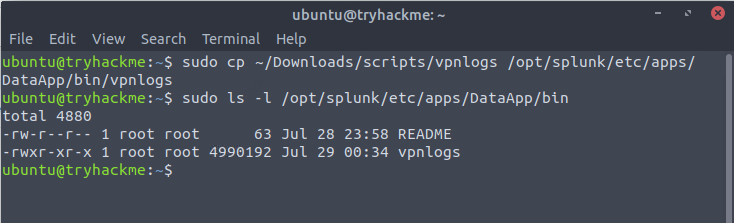
Modify inputs.conf file with nano to match the instructions in the task.
sudo nano /opt/splunk/etc/apps/DataApp/default/inputs.conf
.inputs.conf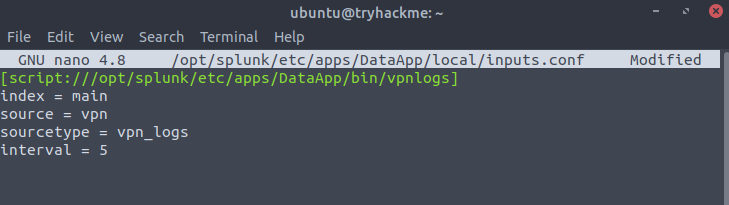
Restart Splunk
Restart Splunk afterwards to apply the new settings
Wait a few minutes until Splunk has restarted and check the logs again. Make sure to change the time range to `All time (Real-time)` so you know for sure you will see the logs. Not seeing any logs? Double check that you correctly copied all lines from the example:
inputs.conf
Restart Splunk afterwards to apply the new settings
sudo /opt/splunk/bin/splunk restart
Wait a few minutes until Splunk has restarted and check the logs again. Make sure to change the time range to `All time (Real-time)` so you know for sure you will see the logs. Not seeing any logs? Double check that you correctly copied all lines from the example:
inputs.conf
[script:///opt/splunk/etc/apps/DataApp/bin/vpnlogs]
index = main
source = vpn
sourcetype = vpn_logs
interval = 5
index = main
source = vpn
sourcetype = vpn_logs
interval = 5
Defining properties
Just like we created the inputs.conf earlier we can create the props.conf to define properties of our data.
props.conf
Just like we created the inputs.conf earlier we can create the props.conf to define properties of our data.
sudo nano /opt/splunk/etc/apps/DataApp/default/props.conf
and restart Splunk again.props.conf
[vpn_logs]
SHOULD_LINEMERGE = true
MUST_BREAK_AFTER = (DISCONNECT|CONNECT)
SHOULD_LINEMERGE = true
MUST_BREAK_AFTER = (DISCONNECT|CONNECT)
You'll now see that each log for the vpn_logs is its own event. If you're not seeing changes you can click on the "apps" dropdown and reload the DataApp from there.
Task 7: Parsing Multi-line Events
Since this task is nearly a repetition of the previous task simply with a different log type, I will not be repeating all the steps in this blog post. Please follow the information in the Task to complete the questions. Make sure to use the correct stanzas in the props.conf and to restart Splunk after you made your changes.
Task 8: Masking Sensitive Data
I personally felt that the inputs.conf file was too inconsistent and rearranged the order of settings as can be seen in the image below. However it does teach an important lesson that the order of settings is not important.
I would personally recommend to update both the inputs.conf and props.conf before restarting to save some time. At this point we've already done this process twice. While it is good practice to inspect the logs before adding any props, it also makes this a very long room with the restart time of Splunk.
Two quick comments here, 1. I used the DataApp/local folder instead of the default. However for the sake of sticking to the "we're creating a new app" task it is better to stick with default. 2 for the source and sourcetype I used the same name as the file that was generating the logs. Personal preference, however when creating an app that will be used by others it is better to stick with consistent naming conventions.
Complete inputs.conf file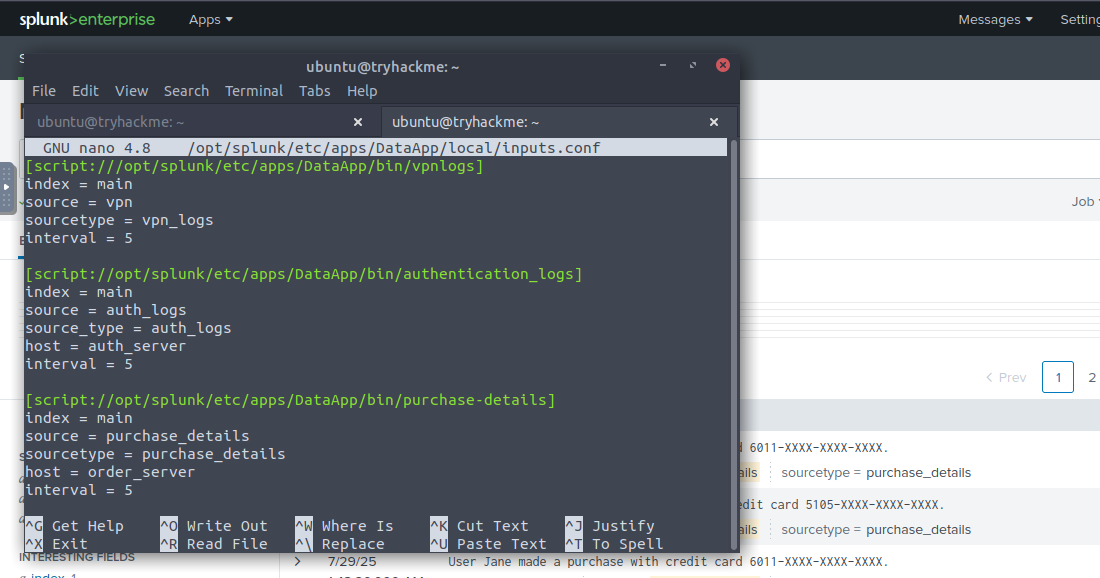
Important to note is that the [sourcetype] header matches the sourcetype: field in inputs.conf. Make sure to verify in your inputs.conf file.
Quick Regex refresher
A quick refresher on Regex to explain the regex we're using in this task
To split the rows of the purchase logs we tell the MUST_BREAK_AFTER stanza to look for
To summarize
To split the rows of the purchase logs we tell the MUST_BREAK_AFTER stanza to look for
\d{4}
which is any 4 digits. Followed by a .
the second \
is used to escape the .
which is a character with special meaning in regex, it means to match any character once.To summarize
\d
= match any digit [0-9].
= match any character once.{4}
= repeat the token before 4 times\
= the next character is plain text and not a tokenComplete props.conf
SEDCMD
I read this command as sed command, since we're using sed syntax to modify. Important to note is that this modification happens BEFORE indexing. That means that our Splunk App is not aware of the information unmodified. This becomes relevant in Task 9.
The regex used in this command is very similar to the MUST_BREAK_AFTER except we're now looking the pattern
-####-####-####
with a /g
global modifier. The global modifier means that if there were two credit card numbers in the log, both would be masked.Note
If you're not seeing these changes but are 100% sure you have to correct syntax, you may have to reload the app. Go to the App menu in the top of the screen, click on DataApp and enter the correct search again.
If you're not seeing these changes but are 100% sure you have to correct syntax, you may have to reload the app. Go to the App menu in the top of the screen, click on DataApp and enter the correct search again.
Task 9: Splunk Data Processing
I'll quickly gloss over most of this task as it is pretty straight forward and the room creator has already provided you with the regex required to complete the first two questions. If you are not seeing the Credit Card field in the fields column on the left, click on "1 more field" and select the Credit Card field in the pop-up.
Select fields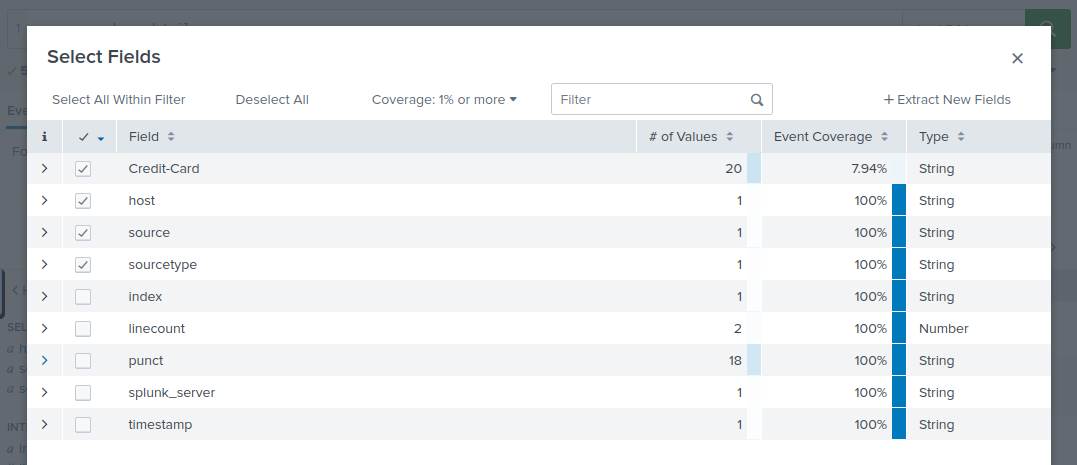
Extracting Credit Card data:
As noted earlier the
Number of unique credit card numbersAs noted earlier the
SEDCMD-cc
action runs before the data is indexed, this means that we have to use X{4}
to match XXXX instead of \d{4}
when extracting the modified Credit Card information.The number one most frequently asked question about this room
"I only see 10 unique credit card numbers but this answer is not accepted."
That is correct. If you followed all the steps in this room in the correct order, by masking the credit card data you will not be able to find all the distinct numbers anymore. You will have to undo the
That is correct. If you followed all the steps in this room in the correct order, by masking the credit card data you will not be able to find all the distinct numbers anymore. You will have to undo the
SEDCMD-cc
, restart Splunk and I recommend changing the time range to 5 minutes. Your answer should be less than 20 but more than 10.Lastly for reference here are the completed props.conf, transform.conf and fields.conf files.
props.conf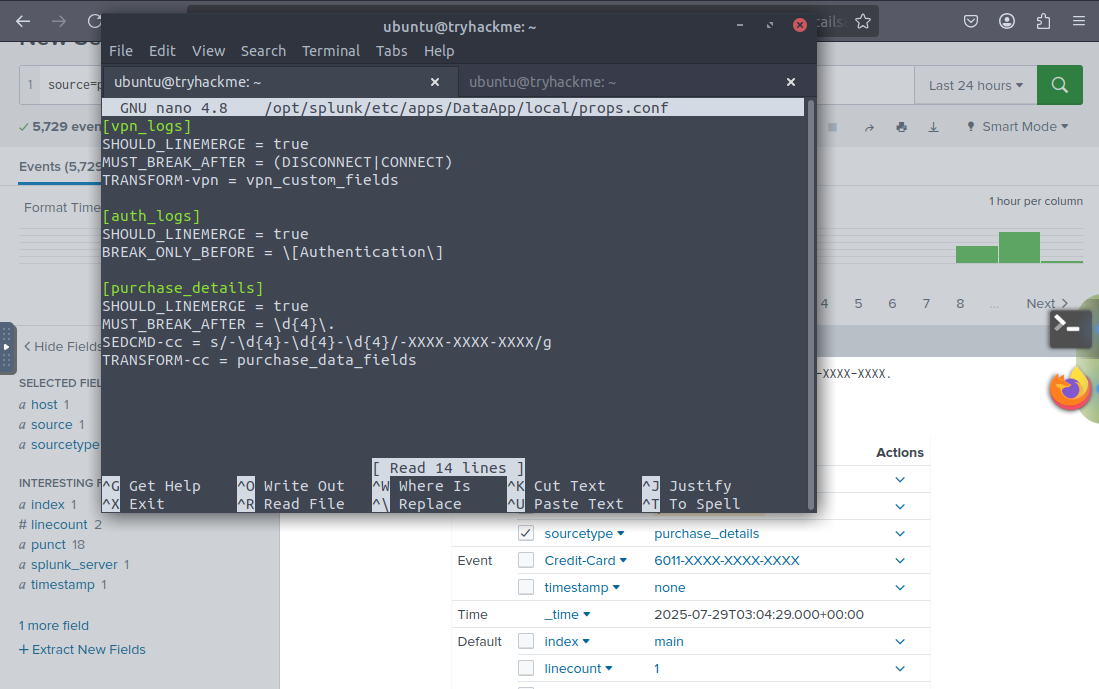
transform.conf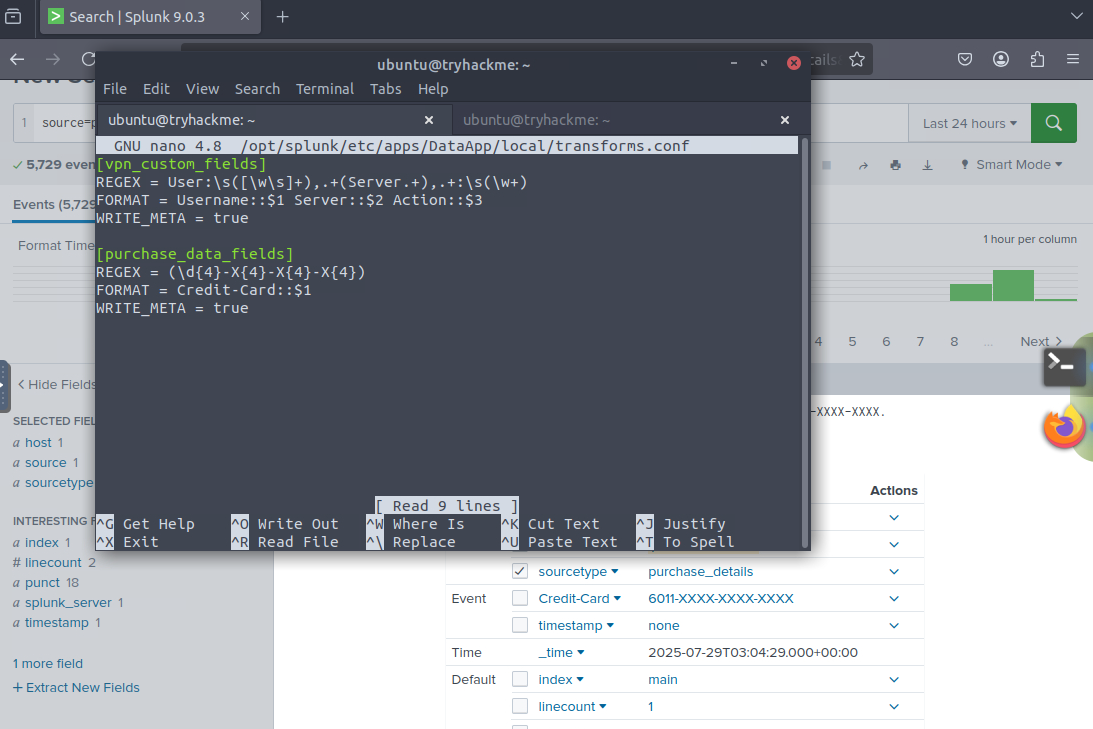
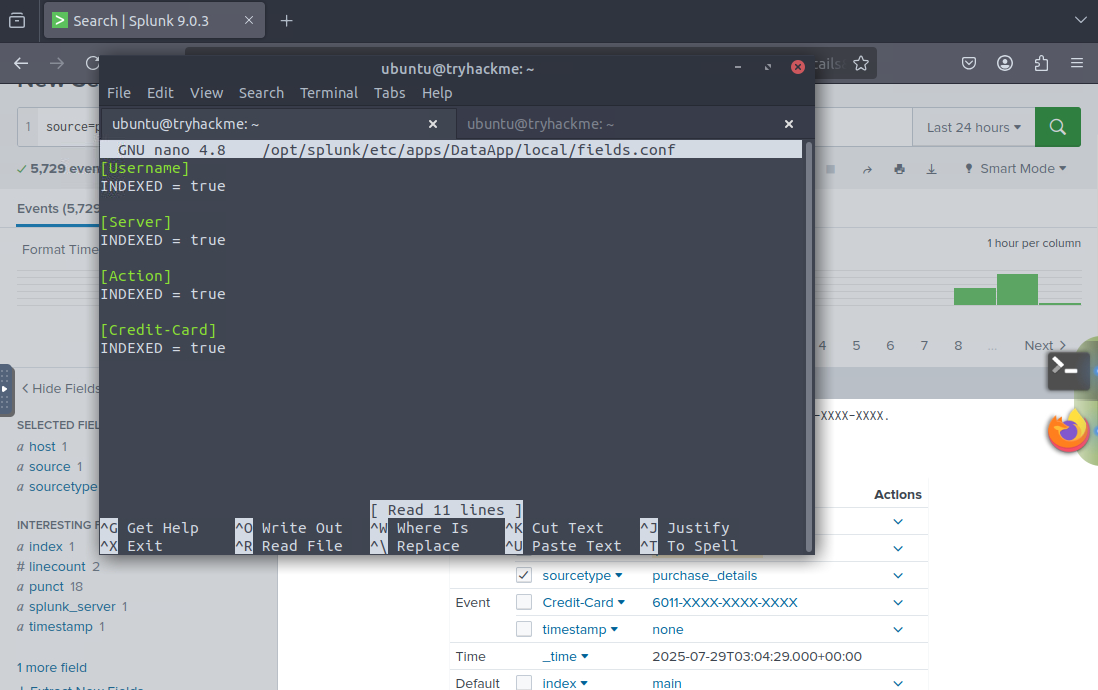
fields.conf